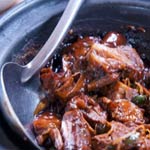
 As we leave the warmth of summer, most of us will combat the chill with heartwarming stews and braises. With braising, you’re taking a cut of meat that is inedible when cooked a short period of time and, through the clever use of slow, moist heat, transforming it into something
tender and flavorful. What allows this transformation is the dissolution of a type of connective tissue, collagen, into gelatin, which requires a warm, moist environment and a long period of time. Happily, when all of that collagen has dissolved into your cooking liquid, it leaves you with a naturally thickened sauce for your completed braise.
Braising Technique
Now…some specifics of technique: Sear your meat well before you add the liquid. If the meat is not seared, then you’re poaching, not braising. The importance of this step is for FLAVOR. There’s no truth in that old belief that searing meats seals its pores and keeps all the juice nicely inside. The only thing searing meat does is add that savory caramelized meat flavor. Do not underestimate this step, however. A piece of meat that has not been seared as opposed to one that has is wan and flat in comparison. When I’m braising any meat I expect to remain whole after cooking (as opposed to meat braised for, say, a pasta sauce or ravioli filling or something) I will dust it in heavily seasoned flour before I sear it. The flour not only aids in browning the meat, but it will also help thicken the braising liquid.
Don’t be shy with the salt and pepper at this point. Most of the salt will fall off of the meat during the browning process, so be aggressive with it. After searing, it’s time to assemble and heat your braising liquid. Now this can be anything… truly. I’m a fan of braising meats in 100% wine that has been flavored with mirepoix vegetables (onion, carrot, and celery for those of you who don’t watch cooking shows obsessively), herbs, and spices. I’ve done braises in only meat stock, in fruit juice, in Coca-Cola, in milk…this point is entirely up to you, just make sure the liquid is hot before pouring it over the meat. Using certain liquids yields different results. Wine adds a nice acidity that slowly changes to sweetness during the braising process, stock yields a nice thick sauce and a very clean meaty flavor, Coke ends up becoming almost like a sticky BBQ sauce after the braise. Pour the liquid over the meat in a properly sized pan, at least 2/3 covered with liquid.
Now, cover the pan tightly with something. If you have a fitting lid for the pan you’re using, great. If you’re not lucky enough to have that (as I do not), just cover the pan with plastic wrap and then foil. The plastic wrap is important as it keeps the steam in the pan as it cooks (don’t worry about the plastic getting in your food; most of it sticks to the foil when you remove it).
When the pan is nicely sealed, toss it in a slow oven for a good long time. A good temperature for braising is about 300°. Some things take longer than others; lamb shanks take 4 to 6 hours and chicken thighs take 45 minutes or so. Test the meat before you take it out of the oven to ensure it’s as tender as you want it to be. If you’re not going to eat the braise immediately (and I suggest you don’t as it’s always better the next day) make sure to cool the meat in the sauce. If you remove the meat to cool it, it will become dry. After the meat has cooled in its own juices, go ahead and remove it and reduce to cooking liquid until it becomes as thick as you want it. Strain that and you’re done!
Reheat the braised meat in a similarly slow and gentle environment, covered with the reduced cooking liquid. I like to eat braised meats over something soft and starchy like polenta or mashed potatoes or even a slice of bread so that the starch can soak up all that lovely, yummy juice.
Enjoy and share with your family and friends, they’ll be impressed when you wheel out the Osso Bucco.